Embed element
It is possible to attach extra, embedded files to the output PDF file. You define this with the embed element, which is inserted by pressing this icon in the designer:


In the output PDF file you will see a paperclip (size and position is specified in the embed element). In other outputs the embed element is ignored.
You see the properties of the embed element, when you create a new element, and if you double click on an existing embed element in the element tree.
The properties are:
- Resource
The file to embed. - Description
A mouse-over description of the file. - Displayed file name
The name of the file, when it is embedded in the PDF. - Error handling
- Size
The size of the paperclip in the output.
The file to embed
A URL to the file, that you want to embed can be stated as the resource:
If you want to link to a local file, then you can do that with a URL like this:
file:/C:/Users/myuser/Pictures/Myfile.jpgIf there is a space in the path, then you need to replace the spaces with %20. You can do that in this way with an XPath expression:
replace('file:/C:/Users/myuser/Pictures/My File.jpg',' ','%20')If you want to embed a file from another server while running on the IBM i platform, then you can refer to the file via QNTC like so:
file:/QNTC/MyServer/Share/file.pdfThe file can be selected in two ways:
- One way is to select it as a fixed constant as shown above. This can be stated, when you see the T on the right as above.
- Another way is to click the T above to switch to expression mode as below. In this mode you can use an Xpath expression to state the URL of the file. You can use the magnifying glass to refer to a path in the sample input XML file or click the <> icon to switch to fixed text mode as above.
If you have bought and configured the Sharepoint integration module you can even embed files from Sharepoint as covered here.
Mouse-over description of the embedded file
It is possible to state a text to be shown in the PDF file, when the receiver of the PDF hovers the mouse over the embed paperclip. You specify that as the description as below:
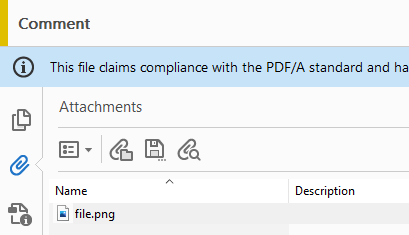
Displayed file name
The displayed file name sets the name of the file, when it is embedded in the PDF file. With the settings shown on the top of this section the file name will be file.png as shown below. Like almost any other field this can of course also be set as an XPath expression e.g. to set a dynamic name that reflect the name of the embedded file.
The size of the paperclip
The size of the paperclip shown as the link in the PDF file is defined with the size parameter:
Related Articles
Comment element
You can use the comment element to document the structure and changes to templates. To insert a comment in your template you need to insert the comment element with this icon: You find this icon by clicking the '+' icon to reveal the second row of ...Select element
In the designer there are two conditional elements: The If element and this, the select element. The select element is an advanced version of the If element, that makes it possible to branch out to different sub-folders with elements, depending on ...If element
It is possible to specify, that some design elements should only be included if a certain condition is met. For that you could use the If element as described below. A more advanced option is to use the select element. You can insert an If element ...Cell element
When you insert a table element in the designer, then each block of the table is referred to in InterformNG2 as a cell. There is no limit the the element types, that you can insert inside a cell; you can even insert a table in a cell. So most of the ...Bookmark element
You can make InterformNG2 add a bookmark element in the output PDF with the Bookmark design element. The element only has an effect on merges into PDF. You can decide, if the bookmarks should be shown when the PDF file is opened and to which level ...