Options for handling detail lines
When it comes to detail lines of a document, then you of course need to use a repeat loop, that iterates across all of the detail lines of your input file.
(You can find that in the document Library of InterformNG2 under Demo/Demo_invoice.xml).
Here the question is: What is the best way to map the nodes inside the detail lines?
If the detail lines are not wrapping to a new page, then you should check out this section: Why detail lines are not overflowing to a new page.
In short you normally have four options:
- You can use a container element with fixed positioned texts inside. You can make a hybrid version of this (with wrap around for a single text), if just a single field can wrap around e.g. the description field only. This is covered under tips.
- You should avoid the use a container with a horizontal flow and texts with fixed widths.
- You can use table inside a repeat loop.
- You can use a table and then activate the repeat option on one row and perhaps other rows.
It is hard to say, what it the best solution, but each solution has their own advantages and disadvantages.
This will hopefully help you to take the right decision.
If you want this output:

Then you can define your template like this:
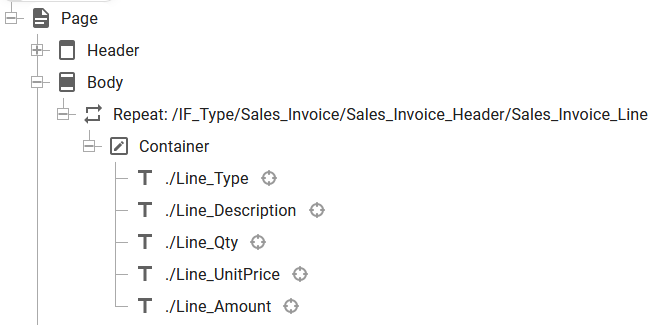
(Here we use a header to include header on all the output pages).
The important thing is, that the container is dynamically positioned even though the texts are fixed positioned inside the container.
- It is easy to understand and easy to start with.
- You can easily reposition all the texts inside. You just drag them to the position, where you want them.
- The container is 'born' with the height of 0, and you need to set a fixed height of the container.
- The container does not grow with the contents, so if you later change the font size (or if a text element can grow to be multiple lines), then you need to change the size of the container.
- Right aligned text are normally not displayed in the right position in the result view - unless you set a fixed width of the text element.
- If the container is inserted in a condition e.g. in a select..when or an if element, then it might not be shown in the result view - only in the final, rendered result.
- It can be a bit of a pain to align the texts - if you forget the alignment options.
- If all of the detail lines are written on top of each other, then you have not set a fixed height of the container.
- If you want to see the right aligned texts in the right position then you can drag in the lower right edge of the text element to set a new width - or of course set it in the text properties.
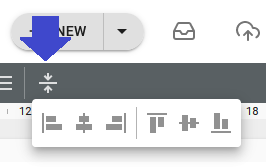
- A help to align the texts (both the header texts and the texts of the detail lines) is the alignment option on the top right of the designer, which is shown, when multiple fixed positioned texts are selected:
- You can consider a hybrid solution, if you have a single field (e.g. a description) that can potentially get too long, so that a wrap around is needed. Here you can build the hybrid in the way, that you change the height of the the description field is the only field, that has a dynamic position (set the position with a left margin) and set the height of the container to be dynamic instead of fixed).
 NOTE: You should avoid the suggestion below, if data in the columns can be too wide for the available width and force a line break. If this line break may force a page break, then the columns might be incorrectly positioned on the following page as the leftmost containers are not used on the new page before they are inserted. A better alternative is to use a table to setup fixed columns.
If you want this output:

Then you can define your template like this:
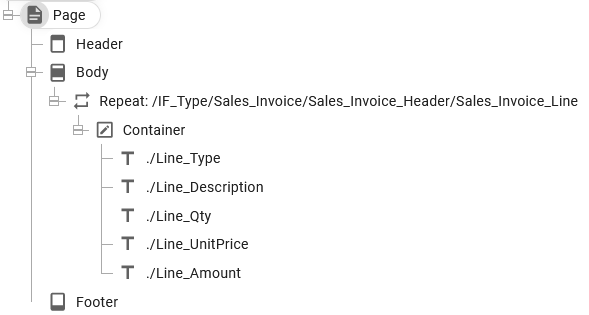
In this setup the Container is setup to use Row as the Flow direction, which is setup here:

We set the dimensions of the container to be dynamic in both directions.
With this flow direction the texts are placed beside each other, but now we need to set a specific width for each text in order to output columns, that have the same width independently on how wide the specific text is:

It is a good idea to only set a fixed width and use a dynamic height on the texts as this will make the container expand in the height to the required height depending on the font size used.
If you want more space between the texts, then you should consider to add a margin to the texts.
If you want to insert multiple output lines within the container, then you should consider to insert the Line break element, which you can find as indicated below:


You can also use the line spacing option on the text to add relatively more space in the vertical direction. The line spacing is setup on the text here:

- The height of the row in the table will as default adapt to the height of the dynamically positioned contents. That means e.g. that if you later change the font size or if the texts can be multi-line texts, then the table will handle this without any issues.
- If you right align texts, then they are shown in the correct position in the result view.
- If you change the width of a text, then all texts to the right of it will be moved accordingly.
- It is easy to change the order of the texts.
- If you insert a new text in the middle of a row, then all texts to the right of it will move accordingly.
- You cannot reposition/drag the texts. If you do that (and make the text to be fixed positioned), then the texts no longer has any effect on the row height.
- You need to type the width of each text manually.
- You cannot align multiple texts with a click on an alignment option. You need manually to set text widths to match them up.
- Remember, that you can use the margins of a text to add more space between the columns.
If you want this output:

Then you can define your template like this:
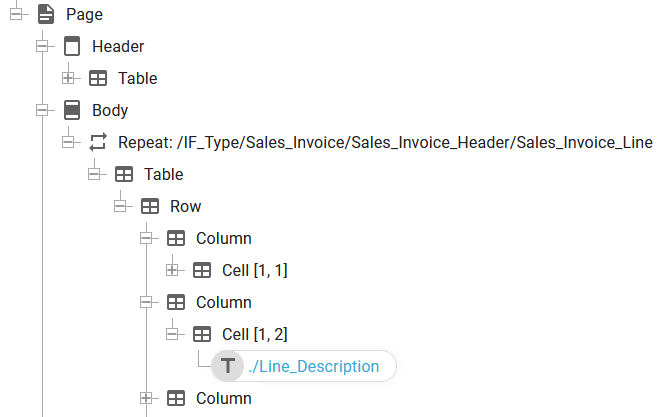
(Here we use a header to include header on all the output pages).
The important thing is, that the table is dynamically positioned and the texts inside are dynamically positioned inside the cells.
- The height of the row in the table will as default adapt to the height of the dynamically positioned contents. That means e.g. that if you later change the font size or if the texts can be multi-line texts, then the table will handle this without any issues.
- If you right align texts, then they are shown in the correct position in the result view.
- If you display the XML contents, then you can drag nodes directly from the XML into the cell.
- You cannot reposition/drag the texts. If you do that (and make the text to be fixed positioned), then the texts no longer has any effect on the row height.
- There is no quick fix to align multiple tables. You need to drag the lines of the table to align texts.
- If you e.g. have a right aligned text in one cell and the cell to the right of that is left aligned, then the two texts are output right next to each other. You need to type in a left or right margin of the texts in order to create space between such dynamically positioned texts.
- If the table is inserted inside of a condition, then it may not be visible in the result view.
- Remember, that you can merge cells.
- Remember, that you can add and delete both rows and columns in the table.
- If is often a good idea to add an extra left column and an extra right columns of the table than necessary, then you can simply drag both the leftmost and the rightmost part of the table, that you actually use.
- You should really consider to use a repeat on a column and combine multiple row layouts inside the same table as covered in this section.
If you want this output:

Then you can define your template like this:
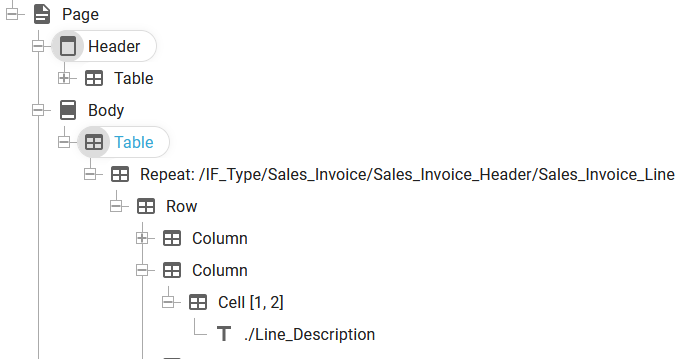
(Here we use a header to include header on all the output pages).
The important thing is, that the table is dynamically positioned and the texts inside are dynamically positioned inside the cells.
The special thing about this solution is, that the repeat is activated on a row.
- This has the same advantages (and more) as for the table inside a repeat loop.
- Another additional advantage is, that you can consider to add more rows after the repeat e.g. to include totals inside the same table. If you then later scale the table, then all contents are scaled and aligned.
- You can use the same table with different row layouts simply by merging cells in some of the rows.
- This share the same disadvantages as the table inside a repeat loop.
- This is an option, that can easily be overlooked/not found and is perhaps not that intuitive to start with.
- The tips for the table inside a repeat loop should be considered.
- Consider to also insert conditioned rows in the same table, if you have multiple layouts in your detail lines. Conditioned rows are shown in the result view, which makes editing of the template easier.
Related Articles
How to iterate across detail lines in spooled file
In this section I will show you how you can make InterFormNG2 iterate across detail lines in an input spooled file, and how to setup conditions on each detail line. This can be done in two different ways depending on which spooled file format, that ...Why detail lines are not overflowing to a new page
If section can help you, if you have created a repeat loop to output all of the detail lines of a document, but unfortunately the detail lines are not overflowing to a new page. Here are the settings, that can prevent an automatic page overflow of ...Aligment options for dynamic placed elements
There are several ways to align dynamic positioned elements in the designer: (These lists alignment options for dynamic positioned elements only. All alignment options are covered here.) 1.You can use the table element to align columns e.g. for ...Template examples
This section includes some template examples: The options for handling detail lines. Set a header, footer and body area for a normal business document. Large header on page 1 only. Make room for total on last page. Labels filled out from top to ...Remove original underline handling in spooled files
Input spooled files in InterformNG2 are always converted into a simple text representation, where one line represents a input spooled file line. This also includes multiple spooled file lines found in the spooled file, that are using overlapping ...