Page element
The page element in InterformNG2 is the container of all the physical elements, that build up the output.
A new template is created with a page element as you need that in order to generate any output at all.
You insert an additional page element with this icon:
It is not possible to create a page element inside a page element, so page elements can only be added in the template level - outside a page in the element tree, so to show and select this icon you need to click the template level:
(The page element is shown on the upper right).
A header and/or footer is required for normal business documents, where you want to keep a header and/or footer to be repeated for all pages.
This section covers these topics:
- The properties (size, rotation, margins and grid layout) of the page.
- How to define a header.
- How a footer is defined.
- The body section of a page.
- Page overflow.
Page properties
If you double click on the page element in the element tree, then you can see and change the properties of the page:
(Other properties are set on the template properties).
The default settings of the page element is set on the main settings in InterformNG2, but you can of course change the settings for the specific page element like below.
For the page size you can either select one of the predefined, fixed size or the Custom page size to set a specific custom size e.g. for label printing. The default paper size is setup on the template defaults for the tenant. The width and height fields are shown (and are editable) for the custom size:
You are not even limited to a fixed size page, you can even state the size via an XPath expression. In this way you can e.g. create a generic template, that works for both the A4 and Letter formats and let a dynamic expression select between the two sizes.
In order to set the page size via XPath you first need to click the T icon on the right:
And then setup the size via an XPath expression. Here you can e.g. consider to use the ng:translation function to translate an input value (e.g. the country) into a specific page size.
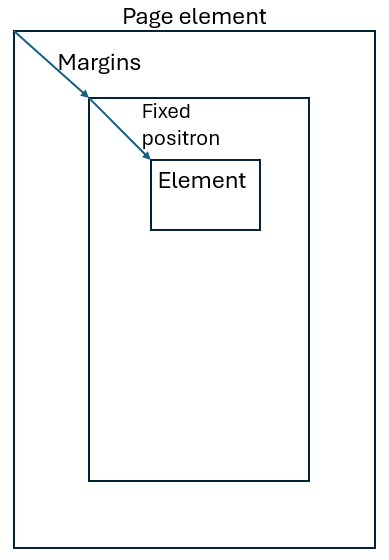
The margins of the page element are the inner margins. On the PCL output there is e.g. an unprintable margin of 6 mm or almost 1/4 Inch, so here it would make sense to define such a margin on the page. Please notice, that the position of the elements inside depends on the margin setting of the page element, so if you later change the margins the contents will shift accordingly. The default margins are setup on the template defaults for the tenant.
Please notice, that if you use a top and left margin the measurements for the fixed positioned elements inside the page element refers to the inside of this margin and not the edge of the paper like below:

You can set the page margins in two ways:
- You can set them via the Designer settings and Template defaults in the top. The margin set here are the default margins used, whenever you create a new template. You can however in each template change the margins on the page element as described below.
- You can change the margins on a specific page element by opening the properties.
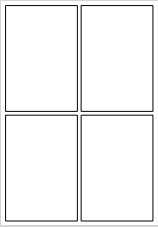
Grid layout is an optional option on the page element. This can be used, if you want to prepare the page output for multiple labels per page e.g. splitting up an A4 page into 4 equally sized labels like this:

(The grid layout can also be combined with a header/footer, if you want to insert other elements than labels on the output pages).
Prerequisites/limitations for the Grid layout
A label is to be defined as the first container element inside the page element. If a header or footer is added, then the container for the label is to be inserted into the body section of the page.
A label is to be defined as the first container element inside the page element. If a header or footer is added, then the container for the label is to be inserted into the body section of the page.
The container for the labels must have a dynamic position.
The container cannot have any margins.
The container must have fixed dimensions.
If the setup is invalid, then you will see this error message:
Invalid grid container
Template.001044: Grid container must have fixed dimensions, dynamic position and no margin.
Grid layout settings
The Grid layout has these settings:
Columns
The number of labels to insert in the horizontal direction. If there is not enough room to insert the specified number of labels (or rather the container for the label), then InterformNG2 will overflow the labels to the next row(s).
Rows
The number of labels to insert in the vertical direction. If there is not enough room to insert the specified number of labels (or rather the container for the label), then InterformNG2 will overflow the labels to the next column(s).
Flow direction
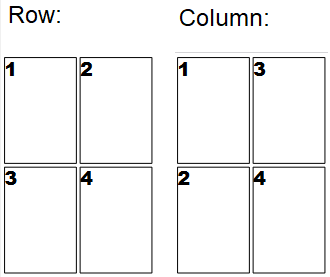
In which sequence the labels are to be inserted. This works independently of the flow direction of the page (or body section) in which the labels are output. The flow direction can be:
Row to insert the labels in the horizontal direction and then insert the next labels below.
Column to insert the labels in the vertical direction and then insert the next labels to the right of the previous ones.

Column gap
This sets the gap (or margin) between the labels in the horizontal direction.
Row gap
Sets the gap (or margin) between the labels in the horizontal direction.
The start position of the first label is defined by:
- The margins set on the page element.
- The start position from the top is also affected by the size of the page header (if used).
The labels above has been defined in a template with this setup:
The important settings are on the page element. The Grid layout is defined like this:
And the container setup is this:
This has setup for an A4 output. On the page element we have in this example a 0.6 cm margin for all edges (not shown above).
In this way the first label is 0.6 cm from the left and the second label is 0.6 cm + 9.5 cm + 0.5 cm= 10.6 cm from the left.
The third label is placed 0.6 cm + 14 cm + 0.5 cm = 15.1 cm from the top.
Related Articles
Page break element
There are several ways to force an extra page in the output: Add an extra page element An overflow of detail lines in the body of a page. Insert a page break element in your template. This section covers the third option. You can insert a dynamic ...Page header
If you are creating a normal business document e.g. an invoice, then you probably want a fixed header with customer name and address and column headings for the detail lines. Such elements must be inserted in the page header element. To create a page ...Page body
The body section of a page If you add a header or footer element to a page, a body element is automatically included as well. The body elements contains the elements, that should only be executed/inserted once. This section normally includes the ...Page overflow
When you insert many dynamically positioned elements in your output, then InterformNG2 will automatically force a page overflow. This section covers the page overflow in details: Introduction Flexible header size. Flexible footer size - for a total ...Page footer
If you want to keep the same footer for all pages of a merge, then you should normally insert them in a footer element of the page element. It is highly recommended to consider to use a template component for the header and/or footer, if the same ...