Email log
With the InterformNG2 email log you can see all emails, that has been generated with InterformNG2.
A prerequisite for the email log is, that it has been activated via the email log setup.
In the email log you can see the status of emails, you can cancel, delete, download, forward emails and release and send emails via the email log. Not all actions are possible for all emails.
You find the email logs from the Dashboard via the email log icon on the top right:
If you click this, then you see a log of all the emails:
On the top left you see these search fields, that you can use, if you want to subset the list of emails:
- Status Filter
The default value is All, which lists all emails. If you click this field, then this list is shown:
If you want to subset the list, then you can here click on or more of the red boxes to alternate exclude/include emails with this specific status as explained below. - Text (for search)
If you are searching for a specific email, then you can here type a text for free text search. The text you type in is searched for in the columns: Subject, From, To, Creator.
The columns of the email log are explained below from the left to the right:
- Time
The date and time of when the email was created. - Subject
The subject of the email. - From
The email address, that was setup as the sender of the email. - To
The receiver(s) of the email. - Creator
As default this is the name of the workflow, that created the email. You can also choose to set this in the workflow before the email is generated with the workflow component, Set email creator. If no workflow was used (this is e.g. the case for a test email from the email server setup), then email is simply shown. - Status
The emails can have these statuses:
Ready | The email is ready, but have not been sent. |
Held | The email is held and will not be sent unless it is either released or forwarded. |
Sent | The email has been sent. It seems to have been sent succesfully, but the sender email address may have received an email regarding an error anyway. |
Queued | This status is shown for delayed emails, that has not been sent yet. |
Remote | If you have chosen to send the email via a remote client, then this status is shown. |
Error | The email could not be sent |
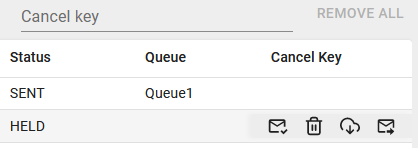
There are several possible actions for the emails in the email log. Not all actions are available for all emails. You can see the available actions for a specific email, if you hoover the mouse over the email. The possible actions are then shown as icons to the very right of the email row:

The possible actions are (from left to right):
- Release and send
This action is illustrated with this icon:
You can use this action only for emails, that are held. If you click this icon, then the email will be sent. When the email have been sent the status of the email will change from Held to Sent. - Delete
You can delete emails with status Held and Delayed with the delete icon:
Emails with other statuses can only be deleted, when they are considered old and deleted automatically. - Download (Open)
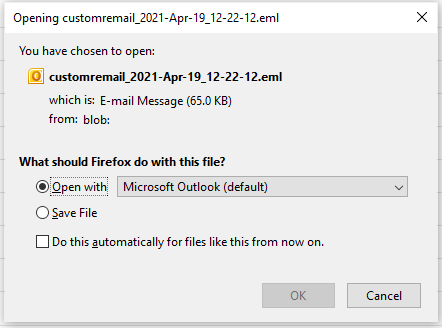
If you want to download and/or open an email, then you can click this icon: - This action is available for all emails no matter what status the emails has.
When you click this option the email might be downloaded to your download folder or you might be able to choose, if you want to download and/or open the email: (It depends on the actual browser, that you use.)
- Forward email
All emails except the queued emails can be sent, if you click this icon:
If you click om this icon, then you are prompted for the email address to which the email is to be forwarded to:
The forwarding of the email is not shown in the email log - only the original email is shown in the email log. - The cancel option is covered in the next section.
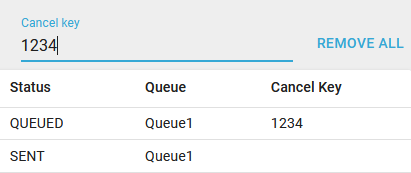
If any delayed emails are shown in the email log, then you will see the options: Cancel key and Remove all on the top right:

You can use these options to manually cancel delayed emails. An alternative is the cancel delayed email component in the workflow.
In the screenshot above you can see, that one of the delayed emails has the cancel key: 1234. By typing 1234 as the cancel key in the entry field above you can decide to manually cancel all emails with this cancel key. When you click the Remove all text on the upper right the email are canceled/deleted. An extra pop-up window afterwards confirms the delete/cancel and shows the number of canceled emails.
You can setup a few things on the list of emails in the email log. That is done on the bottom right of the list:
With this you can select how many rows InterformNG2 should display per page. The possible numbers are: 15, 50 and 200.
With this icon the first (newest) screen is shown:
Click this to change the page to display the list to show newer emails:
Click this to change the page to display the list to show older emails:
Click this to list the oldest emails:
Related Articles
Release log Version 3.x.x
This is the list of the InterFormNG2 releases versions 3.x.x and the major new features in each release: Version 3.5.1 Version 3.5.0 Version 3.4.3 Version 3.4.2 Version 3.4.1 Version 3.4.0 Version 3.3.2 Version 3.3.1 Version 3.3.0 Version 3.2.0 ...Release log Version 1.x.x
This is the list of the InterformNG2 releases versions 1.x.x and the major new features in each release: Version 1.9.0 Version 1.8.0 Version 1.7.1 Version 1.7.0 Version 1.6.0 Version 1.5.4 Version 1.5.3 Version 1.5.2 Version 1.5.1 Version 1.5.0 ...Release log Version 2.x.x
This is the list of the InterformNG2 releases versions 2.x.x and the major new features in each release: Version 2.4.2 Version 2.4.1 Version 2.4.0 Version 2.3.0 Version 2.2.0 Version 2.1.2 Version 2.1.1 Version 2.1.0 Version 2.0.3 Version 2.0.2 ...Email output
This section contains information about emailing from (and to) InterformNG2. For the most email scenarios you would need to setup an email server and then use either of the workflow components, Create PDF email (if you want a standard PDF attachment) ...Release log
This is the list of the InterformNG2 releases and the major new features in each release: Important: InterformNG2 now runs on Java 17. So you need to install Java 17 on Linux and the IBM i platform, if you want to InterformNG2 on either of these ...