Tenant E-mail server
This section concerns E-mail servers (SMTP setup) for a tenant. A similar setup is available for system emails.
For a normal setup you need to configure at least one email server, before you can send emails in InterformNG2. This is covered below.
In order to setup the email servers, you first need to sign in as described here.
Please check the section, Certificates regarding the limited support for certificates.
Then you click E-mail server on the left below Workflow:
Now you see a long list of options for the default email server:
(Only the top options are shown below)
Each of the options are described below:
Top ribbon
This is the internal name of the email server configuration. You can refer to this in the workflow, when you want to email e.g. in the Create PDF email component. You do not need to use the name, DEFAULT. You can just replace this with another name if you want.
Protocol and host
The protocol (smtp or smtps) and email server as well as port number to use for communication with the mail server.
Authentication
If activated you need to state a user and password for the email server account to use. Here you can also change to the more secure (recommended) authentication, OAuth2 for secure emailing with Office365. The setup is covered in the sub-section, Office365 SMTP OAuth2 configuration below.
Message defaults
The defaults settings to use for the email, if they are not specified.
This require, that connections to remote clients are allowed in the global settings, and that at least one remote client as been setup for the current tenant.
If activated you will see this:

The final option on the list is:
If you want to verify the e-mail configuration, you can enter a receiver email address here and click Send test email:
On the right you can see the option to delete/remove the e-mail server configuration from InterformNG2.
Create an additional email server configuration
In the top ribbon of the email server setup you see this ribbon:
The ribbon contains a tab for each email server, that has been defined and also an extra tab with the plus (+) icon. The names shown in this ribbon match the names of the email servers, that you have registered in InterformNG2.
If you want to add an extra email server, then you just click the plus (+) icon in this ribbon:
Delete an email server configuration
Office365 SMTP OAuth2 configuration
If you select OAuth2 for the authentication of your email server, then you will see these extra parameters on the email server setup:
The following describes how to send an e-mail with Office365 SMTP and OAuth2 authentication.
This uses the authorization code flow described here: https://docs.microsoft.com/en-us/azure/active-directory/develop/v2-oauth2-auth-code-flow
Azure Active Directory configuration
Some configuration needs to be done first on Azure Active Directory: https://aad.portal.azure.com/
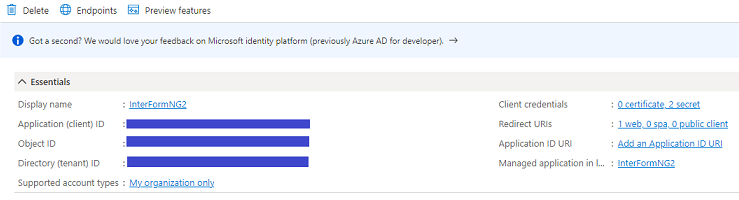
Go to "Azure Active Directory" -> "App registrations" and create a new registration.
The result should look similar to this:
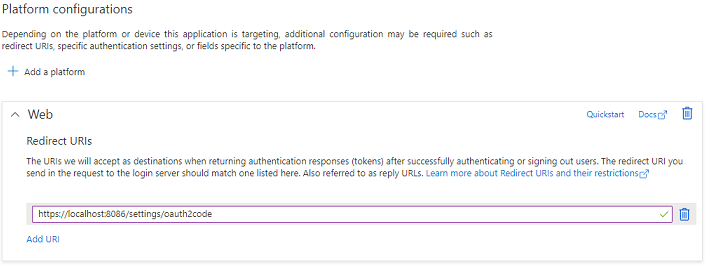
Then select "Authentication" -> "Add a platform" -> "Web". Specify a redirect URI for an InterformNG2 URL that can handle the response, something like http://locahost:8086/settings/oauth2code
The result looks like this:
InterformNG2 settings
On the InterformNG2 settings page, select "Oauth2" as authentication type and enter the tenant id, client id, client secret and redirect URI from the app registration. Set the username to the username of the mailbox that e-mails should be sent from. Save the settings, then use the "Obtain access code" link. You will now be asked to log in to the Microsoft account. Be sure to log in with the same username that is specified in the settings. If you are already logged in to another Microsoft account, the perform this procedure in an incognito browser window.
After completing this process, if everything is working correctly, it should say "Valid access token" on the e-mail authentication settings.

Related Articles
Settings for tenant
This section covers the settings for one tenant (environment). Another section covers the system settings. In order to get access to the tenant settings you need to sign on as a user with administrator rights for the current tenant. To access the ...Workflow tenant settings
This section lists all tenant settings for the workflow. More settings can be setup globally. The tenant specific workflow settings are: Printers.Here you define the printers, that you want to use with InterformNG2. E-mail server. If you want to ...Global email server setup
You need to setup a global email server order to be able to send system emails from InterformNG2 e.g. to reset emails. Notice a similar email configuration for each tenant is normally also required. In order to setup the global email server, you ...Email server inputs
It is in InterformNG2 possible to setup a workflow as an email reader from an input email server and extract data from the incoming email with the workflow input type, Read from email server. A prerequisite for this is, that you first setup an email ...To email server
The advanced output workflow component, to email server is able to send out an email, that you have already configured via one of the tenant email servers. The input payload for this component can be eml or even text or html - as long as the email ...